Git Workflow or GitFlow it’s a development model to work with code and git. We use extended in our code to make conflicts between developers less than possible. The reality is that Git Workflow is branch management for organizing code and developers. There are many ways you can manage branches, we only use 2 or 3 at least, but you can combine them (we do) into more possibilities.
If you don’t know about Git or Branch you can read our previous post:
Basic Workflow
Actually, a lot of developers works alone and git give them the security of know that their code is well organized in a lot of commits. If you are a little bit organized you will do push for every functionality, for example, add a delete button to code, and you know every commit is a function. Sometimes no, simply you are developing and every time you remember to do a commit. This other way too, because you are in fast mode and can’t stop to think some details. Anyway, imagine that you need help and someone comes to help with development tasks. You give them access to git and he/she clone code and begin the work. The most normal is both developers work in the same branch, master.
Let we see what happens. Two developers, Barbara and Victor. One repository with one branch. Victor begins to work:
|
|
$ mkdir ebavs-gitflow $ cd ebavs-gitflow $ git init Initialized empty Git repository in ./Projects/ebavs-gitflow/.git/ $ git remote add origin https://github.com/ebavs/workflow-example.git |
Then create a basic PHP with some HTML inside:
|
|
<?php $msg = 'Victor was here'; ?> <html> <head> <title>Git WorkFlow Example</title> </head> <body> <p>The train goes forward unstoppable</p> <p><?php echo $msg; ?> <body> </html> |
(yes, I forgot one p tag)
Now I add a file and commit push:
|
|
$ git add . $ git commit -m "Created index.php" [master (root-commit) 997017b] Created index.php 1 file changed, 12 insertions(+) create mode 100644 index.php $ git push origin master Username for 'https://github.com': Password for 'https://fromcouch@github.com': Counting objects: 3, done. Delta compression using up to 8 threads. Compressing objects: 100% (2/2), done. Writing objects: 100% (3/3), 347 bytes | 0 bytes/s, done. Total 3 (delta 0), reused 0 (delta 0) To https://github.com/ebavs/workflow-example.git * [new branch] master -> master |
Then Barbara comes to work and Victor give access to her (we use the same user in different folders, that is similar):
|
|
$ mkdir ../ebavs-workflow $ cd ../ebavs-workflow $ git clone https://github.com/ebavs/workflow-example.git . Cloning into 'workflow-example'... remote: Counting objects: 3, done. remote: Compressing objects: 100% (2/2), done. remote: Total 3 (delta 0), reused 3 (delta 0), pack-reused 0 Unpacking objects: 100% (3/3), done. Checking connectivity... done. $ ll total 8 drwxr-xr-x 4 victor staff 136 Dec 14 16:58 . drwxr-xr-x@ 61 victor staff 2074 Dec 14 16:57 .. drwxr-xr-x 13 victor staff 442 Dec 14 16:58 .git -rw-r--r-- 1 victor staff 181 Dec 14 16:58 index.php |
Yeah! we have now the same repo in two folders, it’s like Victor and Barbara works now. Then, Barbara begins to develop and add a new line to index.php:
|
|
<?php $msg = 'Victor was here'; ?> <html> <head> <title>Git WorkFlow Example</title> </head> <body> <p>The train goes forward unstoppable</p> <p><?php echo $msg; ?> <p>But finally brakes and stop</p> <body> </html> |
She commits and pushes:
|
|
$ git commit -am "added stop" [master f2e1adc] added stop 1 file changed, 1 insertion(+) $ git push origin master Counting objects: 3, done. Delta compression using up to 8 threads. Compressing objects: 100% (2/2), done. Writing objects: 100% (3/3), 308 bytes | 0 bytes/s, done. Total 3 (delta 1), reused 0 (delta 0) remote: Resolving deltas: 100% (1/1), completed with 1 local objects. To https://github.com/ebavs/workflow-example.git 997017b..f2e1adc master -> master |
And like a good coworker, she tells to Victor and he pulls changes:
|
|
$ cd ../ebavs-gitflow/ $ git pull origin master remote: Counting objects: 3, done. remote: Compressing objects: 100% (1/1), done. remote: Total 3 (delta 1), reused 3 (delta 1), pack-reused 0 Unpacking objects: 100% (3/3), done. From https://github.com/ebavs/workflow-example * branch master -> FETCH_HEAD 997017b..f2e1adc master -> origin/master Updating 997017b..f2e1adc Fast-forward index.php | 1 + 1 file changed, 1 insertion(+) |
Then Victor review the changes editing index.php. Victor sees p tag mistake and decide to change the line and something else:
|
|
<?php $msg = 'Really Victor was here'; ?> <html> <head> <title>Git WorkFlow Example</title> </head> <body> <p>The train goes forward unstoppable</p> <!-- <?php echo $msg; ?> --> <p>But finally brakes and stop</p> <body> </html> |
He commits and pushes:
|
|
$ git commit -am "solved p tag bug" [master 12ec268] solved p tag bug 1 file changed, 2 insertions(+), 2 deletions(-) $ git push origin master Counting objects: 3, done. Delta compression using up to 8 threads. Compressing objects: 100% (2/2), done. Writing objects: 100% (3/3), 311 bytes | 0 bytes/s, done. Total 3 (delta 1), reused 0 (delta 0) remote: Resolving deltas: 100% (1/1), completed with 1 local objects. To https://github.com/ebavs/workflow-example.git f2e1adc..12ec268 master -> master |
And Barbara, see the same mistake and make similar changes:
|
|
<?php $msg = 'Barbara was here'; ?> <html> <head> <title>Git WorkFlow Example</title> </head> <body> <p>The train goes forward unstoppable</p> <p><?php echo $msg; ?></p> <p>But finally brakes and stop</p> <body> </html> |
And …
|
|
git commit -am "solved p tag bug" [master 61fbf1a] solved p tag bug 1 file changed, 2 insertions(+), 2 deletions(-) $ git push origin master To https://github.com/ebavs/workflow-example.git ! [rejected] master -> master (fetch first) error: failed to push some refs to 'https://github.com/ebavs/workflow-example.git' hint: Updates were rejected because the remote contains work that you do hint: not have locally. This is usually caused by another repository pushing hint: to the same ref. You may want to first integrate the remote changes hint: (e.g., 'git pull ...') before pushing again. hint: See the 'Note about fast-forwards' in 'git push --help' for details. |
.. Fail. What the hell!? both of them changes the same lines and Barbara, second to push have a real problem. But isn’t the big problem, she tries to pull:
|
|
$ git pull origin master remote: Counting objects: 3, done. remote: Compressing objects: 100% (1/1), done. remote: Total 3 (delta 1), reused 3 (delta 1), pack-reused 0 Unpacking objects: 100% (3/3), done. From https://github.com/ebavs/workflow-example * branch master -> FETCH_HEAD f2e1adc..12ec268 master -> origin/master Auto-merging index.php CONFLICT (content): Merge conflict in index.php Automatic merge failed; fix conflicts and then commit the result. |
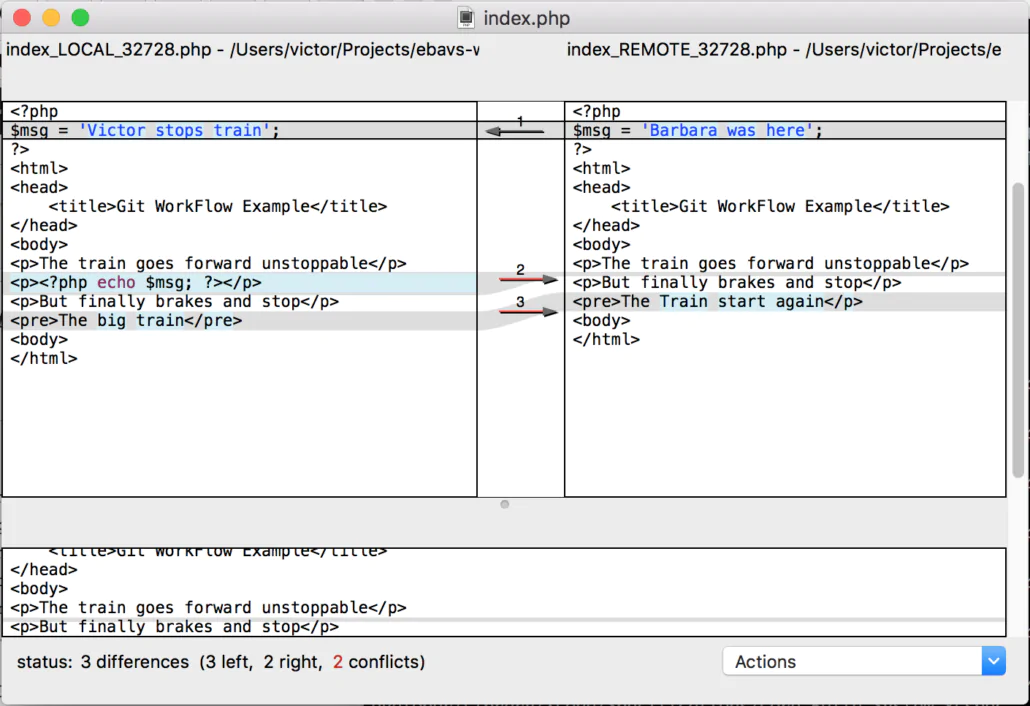
Git found a big conflict because changed lines are the same in two repositories. And Barbara decides to open index.php to see what happened:
1 2 3 4 5 6 7 8 9 10 11 12 13 14 15 16 17 18 19 20 21 |
<?php <<<<<<< HEAD $msg = 'Barbara was here'; ======= $msg = 'Really Victor was here'; >>>>>>> 12ec268ec8266e0cc5ea1fdbde4ebce6724cb5ba ?> <html> <head> <title>Git WorkFlow Example</title> </head> <body> <p>The train goes forward unstoppable</p> <<<<<<< HEAD <p><?php echo $msg; ?></p> ======= <!-- <?php echo $msg; ?> --> >>>>>>> 12ec268ec8266e0cc5ea1fdbde4ebce6724cb5ba <p>But finally brakes and stop</p> <body> </html> |
Oh!! it’s terrible, a lot of awful code is new in the file. Ok, let’s see what we can do. Git divides conflicts into two areas, this is the area corresponding to code in our own machine repository:
|
|
<<<<<<< HEAD $msg = 'Barbara was here'; ======= |
And the other part is corresponding to the server repository:
|
|
======= $msg = 'Really Victor was here'; >>>>>>> 12ec268ec8266e0cc5ea1fdbde4ebce6724cb5ba |
Now Barbara needs to clean code deciding what part is correct and what isn’t (you can use some automatic tools, but that isn’t the purpose of this article). Finally, Barbara cleans the code:
|
|
<?php $msg = 'Barbara was here'; ?> <html> <head> <title>Git WorkFlow Example</title> </head> <body> <p>The train goes forward unstoppable</p> <!-- <?php echo $msg; ?> --> <p>But finally brakes and stop</p> <body> </html> |
And now we need to commit and push again:
|
|
$ git commit -am "merging" [master c65701a] merging $ git push origin master Counting objects: 6, done. Delta compression using up to 8 threads. Compressing objects: 100% (4/4), done. Writing objects: 100% (6/6), 549 bytes | 0 bytes/s, done. Total 6 (delta 2), reused 0 (delta 0) remote: Resolving deltas: 100% (2/2), completed with 1 local objects. To https://github.com/ebavs/workflow-example.git 12ec268..c65701a master -> master |
The difficulty isn’t to modify 2 lines and decide what line is correct. Imagine one file with thousands of code lines and three or four developers. Or Worst, ten files with thousands of modifying code. The poor guy that gets merge problems has all loose day looking for the code problems.
Git Workflows Type
Now we saw the big problem working with the same repository and one branch. We discuss now different ways to avoid problems with different types of workflows.
Feature Branch Workflow
After the hell of Basic Workflow or Centralized Workflow, it’s easy to think to leave this kind of work. It’s a hell, a real hell. I participate in a 4 members team, a lot of years ago, working with Centralized Workflow and was really hell. Entire weeks loses merging code, it was a nightmare.
All of my problems could have been solved used this simple way of work. Making single Branch for every feature. The idea is simple, you make a new branch for every feature you need to implement.
Let’s explain and continue the Barbara and Victor history :)
After Victor review the code decides to move to Feature Branch Workflow then he decides to create two branches, one for add code and another for add HTML:
1 2 3 4 5 6 7 8 9 10 11 12 13 14 15 16 17 18 19 20 21 |
$ git branch * master $ git checkout -b feature-code Switched to a new branch 'feature-code' $ git checkout master Switched to branch 'master' Your branch is up-to-date with 'origin/master'. $ git checkout -b feature-html Switched to a new branch 'feature-html' $ git push origin feature-code Total 0 (delta 0), reused 0 (delta 0) To https://github.com/ebavs/workflow-example.git * [new branch] feature-code -> feature-code $ git push origin feature-html Total 0 (delta 0), reused 0 (delta 0) To https://github.com/ebavs/workflow-example.git * [new branch] feature-html -> feature-html $ git branch feature-code * feature-html master |
With git checkout -b new branch can create a new branch and change to them, the important is -b option that means “create a new branch. Now we are in feature-HTML and we need to add some HTML file to our index.php, Barbara begins their work:
|
|
<?php $msg = 'Barbara was here'; ?> <html> <head> <title>Git WorkFlow Example</title> </head> <body> <p>The train goes forward unstoppable</p> <p>But finally brakes and stop</p> <pre>The Train start again</p> <body> </html> |
We remove the commented PHP line and add a new one at the end. Now it’s time to commit and push.
|
|
$ git commit -am "added html part" [feature-html 1326f71] added html part 1 file changed, 1 insertion(+), 1 deletion(-) $ git push origin feature-html Counting objects: 3, done. Delta compression using up to 8 threads. Compressing objects: 100% (2/2), done. Writing objects: 100% (3/3), 309 bytes | 0 bytes/s, done. Total 3 (delta 1), reused 0 (delta 0) remote: Resolving deltas: 100% (1/1), completed with 1 local objects. To https://github.com/ebavs/workflow-example.git c65701a..1326f71 feature-html -> feature-html |
Now time for Victor, he needs to add some code, first we change the branch and begin codification:
|
|
$ git checkout feature-code Switched to branch 'feature-code' $ nano index.php $ git commit -am "added code" [feature-code 3c8aa1e] added code 1 file changed, 3 insertions(+), 2 deletions(-) $ git push origin feature-code Counting objects: 3, done. Delta compression using up to 8 threads. Compressing objects: 100% (2/2), done. Writing objects: 100% (3/3), 400 bytes | 0 bytes/s, done. Total 3 (delta 0), reused 0 (delta 0) To https://github.com/ebavs/workflow-example.git c65701a..3c8aa1e feature-code -> feature-code |
We have actually 3 branches with different codes and need this code altogether. Like Victor is a master developer, he controls now the merge ad code, first integrates the feature-code branch:
1 2 3 4 5 6 7 8 9 10 11 12 13 14 15 16 17 18 19 20 21 22 23 |
$ git checkout master Switched to branch 'master' Your branch is up-to-date with 'origin/master'. $ git pull origin master From https://github.com/ebavs/workflow-example * branch master -> FETCH_HEAD Already up-to-date. $ git pull origin feature-code From https://github.com/ebavs/workflow-example * branch feature-code -> FETCH_HEAD Updating c65701a..3c8aa1e Fast-forward index.php | 5 +++-- 1 file changed, 3 insertions(+), 2 deletions(-) $ git status On branch master Your branch is ahead of 'origin/master' by 1 commit. (use "git push" to publish your local commits) nothing to commit, working directory clean $ git push origin master Total 0 (delta 0), reused 0 (delta 0) To https://github.com/ebavs/workflow-example.git c65701a..3c8aa1e master -> master |
See the process, first change branch to master: git checkout master
Then pull code from the server, we need to have the latest code: git pull origin master
Then pull feature-code branch: git pull origin feature-code
Now we have merged code, we could do the same with git merge feature-code
After code merged we need to push: git push origin master
Now we can do the same process with the other branch:
|
|
$ git pull origin feature-html From https://github.com/ebavs/workflow-example * branch feature-html -> FETCH_HEAD Auto-merging index.php CONFLICT (content): Merge conflict in index.php Automatic merge failed; fix conflicts and then commit the result. |
It’s the same error as before, but here resides the difference: Victor, in this case, are Team Lead, knows what happens with code and how to resolve conflicts, indifferent to Barbara that just arrives at the project. Too we introduce new command: git mergetool
Maybe you haven’t configured the repository with any tool, but your system won’t let you alone:
|
|
$ git mergetool This message is displayed because 'merge.tool' is not configured. See 'git mergetool --tool-help' or 'git help config' for more details. 'git mergetool' will now attempt to use one of the following tools: opendiff tortoisemerge emerge vimdiff Merging: index.php Normal merge conflict for 'index.php': {local}: modified file {remote}: modified file Hit return to start merge resolution tool (opendiff): |
I’m assuming that open diff is there and just hitting enter:
This looks better than edit the directly file in the editor. The tool will be different depending on your Operating System, my case is Mac OS X then this is the default tool. Just arrange some lines and finish.
And:
|
|
$ git commit -am "merged" [master e72e0cc] merged $ git push origin master Counting objects: 3, done. Delta compression using up to 8 threads. Compressing objects: 100% (2/2), done. Writing objects: 100% (3/3), 318 bytes | 0 bytes/s, done. Total 3 (delta 1), reused 0 (delta 0) remote: Resolving deltas: 100% (1/1), completed with 1 local objects. To https://github.com/ebavs/workflow-example.git 3c8aa1e..e72e0cc master -> master |
Yes, we have completed our Feature Branch Workflow. If you use Bitbucket web page or Github web page for make merges is more easy and intuitive. I will talk about merge with bitbucket or GitHub in another post.
User Branch Workflow
User Branch development isn’t recommended for any. Just is to create a branch for every person in your team and all of them do merges to master. It’s also highly recommended to merge from the master te person branch. I worked before with this system in a big company with a little crazy Lead Developer. It’s not a bad idea if you are small teams (two persons), but with big teams it’s insane.
No examples here, just wanted to comment on the option.
GitFlow
GitFlow borns with nvie post.
He explains a way to organize branches to work. It’s easy, it’s organized, it’s cool, it’s fantastic, terrific! Nvie divides work into two main branches and supporting branches. Let’s see how it works.
Main Branches
After you init your repository and add some code you need to add one branch called to develop. You will have two main branches:
- master: master branch will be the production branch. The code here is the same as will be on the production server. Every time you merge code from developing to here means you need to upload code (or push-pull) to production.
- develop: this is the main branch where code comes to test before production. No one uses this branch, the code only come from merges.
It’s easy to understand. The Master branch is production, develop is where we test code. When you think the code is correct in development it’s time to merge to master and upload to production.
Supporting Branches
Are three types of auxiliary branches:
- Feature Branches: Every time you need to make a new feature you can create a feature branch. You can name wherever you want, but in EBAVS/ we name with feature-* convention:
|
|
$ git checkout -b feature-newfeature develop Switched to a new branch "myfeature" $ git checkout develop Switched to branch 'develop' $ git merge --no-ff feature-newfeature Updating fa5b31f..4be9466 $ git branch -d feature-newfeature Deleted branch feature-newfeature (was 4be9466). $ git push origin develop |
Is important to use –no-ff option. This means no fast forward. Fast Forward loses history when you do merge. Is important to maintain history.
- Releases Branches: Releases Branches is where features go, you can prepare here a production release. They born in develop branch and You can name with a minor or revision number. After you finish release, you can merge with the master branch directly, create a tag with revision, merge release into develop and finally remove the release branch:
1 2 3 4 5 6 7 8 9 10 11 12 13 14 15 16 17 18 19 20 21 |
$ git checkout -b release-0.2 develop Switched to a new branch "release-0.2" $ git checkout master Switched to branch 'master' $ git merge --no-ff release-0.2 Merge made by recursive. (Summary of changes) $ git tag -a 0.2 $ git checkout develop Switched to branch 'develop' $ git merge --no-ff release-0.2 Merge made by recursive. (Summary of changes) $ git branch -d release-0.2 Deleted branch release-0.2 (was eb425ee). |
- Hotfix Branches: Hotfix branches are branches that born from the master branch because code needs to fix urgently. After fixing the code you can merge again to master and develop. Naming is with revision number:
1 2 3 4 5 6 7 8 9 10 11 12 13 14 15 16 17 18 |
$ git checkout -b hotfix-0.2.1 master Switched to a new branch "hotfix-0.2.1" $ git merge --no-ff hotfix-0.2.1 Merge made by recursive. (Summary of changes) $ git tag -a 0.2.1 $ git checkout develop Switched to branch 'develop' $ git merge --no-ff hotfix-0.2.1 Merge made by recursive. (Summary of changes) $ git branch -d hotfix-0.2.1 Deleted branch hotfix-0.2.1 (was ab531fb). |
Finally
This tool is powerful, you can use it to organize your code or to ensure that you can develop in a quick and safe way. But if you use it in a bad way could convert into pain. GitFlow it’s a good workflow we can use actually. Maybe are others, but this one fits perfectly in our day to day coding.