Webpack with ES6 tutorial for beginners

Webpack is actually the best tool to create web pages. Is the next generation tool after gulp and grunt. For me is really easy to configure and manage and I want to show you how I can make projects with this tool.
Tabla de contenidos
Prerequisites
First of all, we need nodes running on our machines. Open terminal or command line and try if you have installed node.js:
|
1 |
$ node -v |
if you have installed you see the version of node, if not you need to install it, we have a little post explaining how to install:
You can clone the finished project from GitHub for reference: Github EBAVS/ Webpack ES6 tutorial
Configure Project
Now we need to initialize and configure the basics. Create a project folder on your computer and enter.
Initialise Project
First, we need the basics. We work with nodes and this tool uses a file called package.json to manage projects and dependencies. To create this file we need to execute the npm init command and answer questions.
|
1 2 3 4 5 6 7 8 9 10 11 12 13 14 15 16 17 18 19 20 21 22 23 24 25 26 27 28 29 30 31 32 33 34 35 36 37 38 39 40 41 42 43 44 45 46 47 48 49 50 |
$ npm init This utility will walk you through creating a package.json file. It only covers the most common items, and tries to guess sensible defaults. See `npm help json` for definitive documentation on these fields and exactly what they do. Use `npm install <pkg>` afterwards to install a package and save it as a dependency in the package.json file. Press ^C at any time to quit. package name: (webpack-starter) version: (1.0.0) 0.0.1 description: Webpack starter kit entry point: (index.js) test command: git repository: http:// keywords: ebavs webpack javascript js es6 ecmascript6 babel eslint author: Victor license: (ISC) About to write to /webpack-starter/package.json: { "name": "webpack-starter", "version": "0.0.1", "description": "Webpack starter kit", "main": "index.js", "scripts": { "test": "echo \"Error: no test specified\" && exit 1" }, "repository": { "type": "git", "url": "http://" }, "keywords": [ "ebavs", "webpack", "javascript", "js", "es6", "ecmascript6", "babel", "eslint" ], "author": "Victor", "license": "ISC" } Is this ok? (yes) |
Install Webpack
Now is time to install webpack. We search to install webpack itself and a tool called webpack-dev-server that we will use later.
|
1 |
npm install webpack webpack-dev-server --save-dev |
The –save-dev option means that webpack is installed locally like development dependency in the project. If you want to install globally you can use -g option instead. I prefer local because is changing very fast and I don’t to leave working if I update globally to the last version.
First Steps and Configs
We create 2 folders. One for our code and another one for transpiled code (transpile is the way of transform one code into another code, for example, we will transform es6 in javascript)
|
1 2 |
$ mkdir src $ mkdir dist |
And create an index.js file inside src/ folder with the next easy content.
|
1 |
console.log("I'm alive!"); |
Create webpack.config.js and add the basic part of the configuration:
|
1 2 3 4 5 6 7 8 9 10 11 12 13 14 |
const conf = { src: __dirname + '/src', dist: __dirname + '/dist' }; module.exports = { entry: [ conf.src + '/index.js' ], output: { filename: 'bundle.js', path: conf.dist } }; |
This is the minimal configuration: we add a conf object with a path telling the two important paths. A second area, with module.export tells webpack what file needs to look like and what file need to generate.
Then we need to create a command to execute webpack through the command line. Open package.json and add “serve” task to scripts area. Scripts area looks like this:
|
1 2 3 4 |
"scripts": { "serve": "webpack --config webpack.config.js", "test": "echo \"Error: no test specified\" && exit 1" }, |
“serve” task executes webpack calling webpack.config.js and transpile js to another file.
And now try to run with the next command in bash:
|
1 2 3 4 5 6 7 8 9 10 11 |
$ npm run serve > webpack-starter@0.0.1 serve /Users/victor/Projects/webpack-starter > webpack --config webpack.config.js Hash: 6df9f811112873c143dc Version: webpack 3.8.1 Time: 60ms Asset Size Chunks Chunk Names bundle.js 2.66 kB 0 [emitted] main [0] multi ./src/index.js 28 bytes {0} [built] [1] ./src/index.js 72 bytes {0} [built] |
We created our bundle.js file. But we haven’t HTML yet and for the test, we need to use node:
|
1 2 |
$ node dist/bundle.js I'm alive! |
No, this is not a web!
But’s not the point. Why? Because we are developing a web and this not a web. We don’t want a node web application. We want a web. Ok, let’s add HTML basic. Now make an index.html inside src/ folder and add basic HTML code, we don’t need more:
|
1 2 3 4 5 6 7 8 9 10 |
<!DOCTYPE html> <html lang="en"> <head> <meta charset="UTF-8"> <title>Ebavs/</title> </head> <body> </body> </html> |
Install a required plugin for this operation.
|
1 |
$ npm install html-webpack-plugin --save-dev |
Open webpack.config.js and then open a new section called plugin adding new HTML webpack plugin:
|
1 2 3 4 5 6 7 8 9 10 11 12 |
module.exports = { entry: [ conf.src + '/index.js' ], output: { filename: 'bundle.js', path: conf.dist }, plugins: [ new HtmlWebpackPlugin() ] }; |
You can see HtmlWebpackPlugin Documentation here: Jantimon Github Webpack plugin html
Now we can execute again:
|
1 2 3 4 5 6 7 8 9 10 11 12 13 14 15 16 17 18 |
$ npm run serve > webpack-starter@0.0.1 serve /Users/victor/Projects/webpack-starter > webpack --config webpack.config.js Hash: f8a2fccda0a056ba3b84 Version: webpack 3.8.1 Time: 390ms Asset Size Chunks Chunk Names bundle.js 2.66 kB 0 [emitted] main index.html 182 bytes [emitted] [0] multi ./src/index.js 28 bytes {0} [built] [1] ./src/index.js 72 bytes {0} [built] Child html-webpack-plugin for "index.html": 1 asset [2] (webpack)/buildin/global.js 488 bytes {0} [built] [3] (webpack)/buildin/module.js 495 bytes {0} [built] + 2 hidden modules |
If we look inside dist/ folder we could see two files; index.html and bundle.js. HtmlWebpackPlugin gets js from config, and inject script tag inside HTML, if you open index.html with the browser and open inspector you should see “I’m alive!” message.
Actually, this is a little project, but don’t want to stop here. This is only the beginning. Let’s continue.
Begin to build a real web page with webpack
At this point, you have webpack with a little configuration but isn’t real. In a real project, you maybe use Bootstrap or Foundation with jQuery or maybe Angular. Anyway, also we need to know what we want to do, and I believe that a better thing is a TODO list!
For a real and simple to-do list, we need some images, fonts, CSS, maybe effects and good code. Good code, actually, means ES6 or ES7. We choose ES6. Then, we have all chosen, let’s do begin.
ES6 or ECMAScript 2015
Modern browsers do not understand ES6, we need to transpile to old-fashioned javascript. To make these transpilations we use babel. Babel is a library that understands a lot of languages and can transpile to javascript.
Install Babel (you can go to https://babeljs.io/ to see all capabilities, I only choose few for this project):
|
1 |
$ npm install babel-loader babel-core babel-preset-env --save-dev |
Now we tell webpack that use babel for transpile, to do that we need to add the area of a module with rules config:
|
1 2 3 4 5 6 7 8 9 10 11 12 13 14 15 16 17 18 19 |
entry: [ conf.src + '/index.js' ], output: { filename: 'bundle.js', path: conf.dist }, module: { rules: [ { test: /\.js$/, include: conf.src, loader: 'babel-loader' } ] }, plugins: [ new HtmlWebpackPlugin() ] |
Explanation: We are telling you that all js files (test property) in src/ folder needs to be loaded with babel-loader.
Now, to be sure that we are writing good and correct code we install a lint loader. Every time we write bad code lint tell us to correct:
|
1 |
$ npm install eslint-loader eslint babel-eslint eslint-config-airbnb eslint-plugin-import --save-dev |
And their rule inside modules:
|
1 2 3 4 5 6 7 8 9 10 11 12 13 14 15 16 |
module: { rules: [ { enforce: 'pre', test: /\.js$/, include: conf.src, exclude: /node_modules/, loader: 'eslint-loader' }, { test: /\.js$/, include: conf.src, loader: 'babel-loader' } ] }, |
We use enforce to be sure that we are executing eslint before babel. Thes use excludes because not want lint al external module.
Now in our root folder need to create a file called .eslintrc.json with this content:
|
1 2 3 |
{ "extends": "airbnb-base" } |
We are telling that eslint uses Airbnb rules. You can install other rules, Google has their:
|
1 |
$ node install eslint-config-google --save-dev |
And change “extends” to “google”, but not our case, Airbnb has good ones, you can inspect their rules: https://github.com/airbnb/javascript
Optional: if you want you can add a task in package.json spripts area to lint only. I think that is not needed but is good to be there:
|
1 2 3 4 5 |
"scripts": { "serve": "webpack --config webpack.config.js", "lint": "eslint src/ webpack.config.js", "test": "echo \"Error: no test specified\" && exit 1" }, |
Install dependent libraries
It’s time to install bootstrap and jQuery. These libraries have their package in npm repository. Install it:
|
1 |
$ npm install bootstrap jquery --save |
See that we used –save and not –save-dev. This is because these two libraries are used in our project and need to be there in production.
Test jQuery
Now test jQuery. Open index.js from src/ folder and change a little bit, remove console.log and add next lines:
|
1 2 3 |
import $ from 'jquery'; $('body').html('<p>I\'m alive!</p>'); |
If we transpile and open the browser we can see “I’m alive” on a browser page. Cooooool! we are moving forward, we have a phrase in the browser instead of the inspector.
But for use with Bootstrap we need more config, open webpack.config.js and add a new first line:
|
1 |
const webpack = require('webpack'); |
Then we tell config that uses a new plugin to convert jQuery into a global variable, plugins will be:
|
1 2 3 4 5 6 |
plugins: [ new HtmlWebpackPlugin(), new webpack.ProvidePlugin({ jQuery: 'jquery' }) ] |
if you halt this step, after add bootstrap, you will have an error saying that jQuery is not found.
Configure and test CSS/Bootstrap
Bootstrap is a collection of CSS and JS libraries. Include Bootstrap in our code needs an extra effort, first we install all needed and then I explain what is every module:
|
1 |
$ npm install style-loader css-loader sass-loader node-sass file-loader --save-dev |
Yeah!
- style-loader: gets our CSS files and inject them inside <style> tags.
- CSS-loader: interprets @import and url() from CSS and resolve them
- sass-loader (node-sass): gets sass and transpiles to CSS
- file-loader: gets a file and return new name with md5 hash. It’s needed by previous loaders.
Open webpack.config.js and add:
|
1 2 3 4 5 6 7 8 9 10 11 12 13 14 15 16 17 18 19 20 21 22 23 24 25 26 |
{ test: /\.(scss|css)$/, use: [ { loader: 'style-loader', options: { sourceMap: true } }, { loader: "css-loader", options: { sourceMap: true } }, { loader: "sass-loader", options: { outputStyle: 'expanded', sourceMap: true, sourceMapContents: true } } ], include: [conf.src] }, |
Paste this code after babel-loader rule.
ES6 doesn’t know how to handle and import current CSS. If you try to import bootstrap CSS directly to index.js you will have an error. To avoid this we make a style.scss and put it in src/ folder with next content:
|
1 |
@import '~bootstrap/dist/css/bootstrap.css'; |
The tilde (~) means that need to look inside the node_modules folder.
And finally, we add code to index.js that looks like this:
|
1 2 3 4 5 6 |
import $ from 'jquery'; import 'bootstrap'; import './style.scss'; $('body').html('<div class="container"><p>I\'m alive!</p></div>'); |
I’ve added a new div to see if bootstrap is working. Run npm task …….. And yeees!

Webpack-dev-server
Now, we have to work our base to begin the development, but I don’t want to run webpack every time I made a change in code. To avoid running tasks every time, we have two options; You can run webpack with –watch, which is good or you can run webpack-dev-server, which is better.
The difference is that –watch option leave webpack executed and run every time that rode is changed. It’s ok, but we need more power because we are developing web, and debug javascript, then is better a web server. With webpack-dev-server, you will have a real web-server integrated with webpack. We installed with webpack, the only want we need changes configuration. Open package.json and change server option:
|
1 |
"serve": "webpack-dev-server --config webpack.config.js" |
Then if you run:
|
1 |
$ npm run serve |
You will see all compilations, listings and then ready to browse: http://localhost:8080/
Changing webpack-dev-server configuration
Alternatively, you can change some parameters of the web server adding some parameters in webpack.config.js:
|
1 2 3 4 5 6 7 8 9 10 11 |
module.exports = { devServer: { port: 3000 }, entry: [ conf.src + '/index.js' ], output: { filename: 'bundle.js', path: conf.dist }, |
Adding devServer to config we can change the port, I prefer 3000 instead 8080.
You can see all options here: https://webpack.js.org/configuration/dev-server/
Developing Project
We have now the project with a good base. Let’s begin to create our real to-do application.
Making Views
ES6 have one important feature, have templating. You can store HTML in a variable and then inject it later on our web page.
Make new views.js in src/ folder. We put inside the little templates for creating the page:
|
1 2 3 4 5 6 7 8 9 10 11 12 13 14 15 16 17 |
const container = ` <div class="container"> <h1>EBAVS/ Todo</h1> <main></main> </div> `; const todoBox = ` <div class="row"> <div class="col-md-8 col-md-offset-2"> <input type="text" class="form-control todo-item" /> </div> </div> `; const viewCollection = { container, todoBox }; export default viewCollection; |
We have here to constants with a little bit of HTML. The first constant is the container. The second one is the input text box where we will write tasks.
After definition, we add to an object collection and use export to say ES6 that we can use in other files.
Then we can open style.scss file and add some CSS to separate box to the top of the page:
|
1 2 3 |
main { margin-top: 80px; } |
Making Controller
Now we make the controller, create a file called controller.js. Thi file will be responsible to load views and manage events and data.
It’s time to make with a few lines, only for initialize and show data to the browser:
|
1 2 3 4 5 6 7 8 9 10 11 12 13 14 15 16 17 18 19 20 21 22 23 24 25 26 27 28 29 30 31 32 33 34 35 36 37 |
export default class Controller { /** * @param {!$} jq jQuery * @param {!viewCollection} vc viewCollection array */ constructor(jq, vc) { this.jquery = jq; this.views = vc; } initViews() { // construct base view const container = this.jquery(this.views.container); this.jquery('body').html(container); this.jquery(this.views.todoBox).appendTo('main'); } /** * @param {!event} e jQuery event */ static addItem(e) { } bindEvents() { // we can do better but is a simple tutorial to understand webpack and ES6 this.jquery('.todo-item').on('keypress', e => (Controller.addItem(e))); } start() { // initialize all this.initViews(); this.bindEvents(); } } |
Then we have a constructor that receives jQuery and views and store them in properties. Then you have initViews method that initializes HTML and injects it to DOM via jQuery. Then you have bindEvents to bind events to DOM and start a method that calls previous methods.
Put it all working
We have two files (views and controllers) but aren’t called yet. Then open index.js and will see this code:
|
1 2 3 4 5 6 7 8 9 10 |
import $ from 'jquery'; import 'bootstrap'; import './style.scss'; import viewCollection from './views'; import Controller from './controller'; const c = new Controller($, viewCollection); c.start(); |
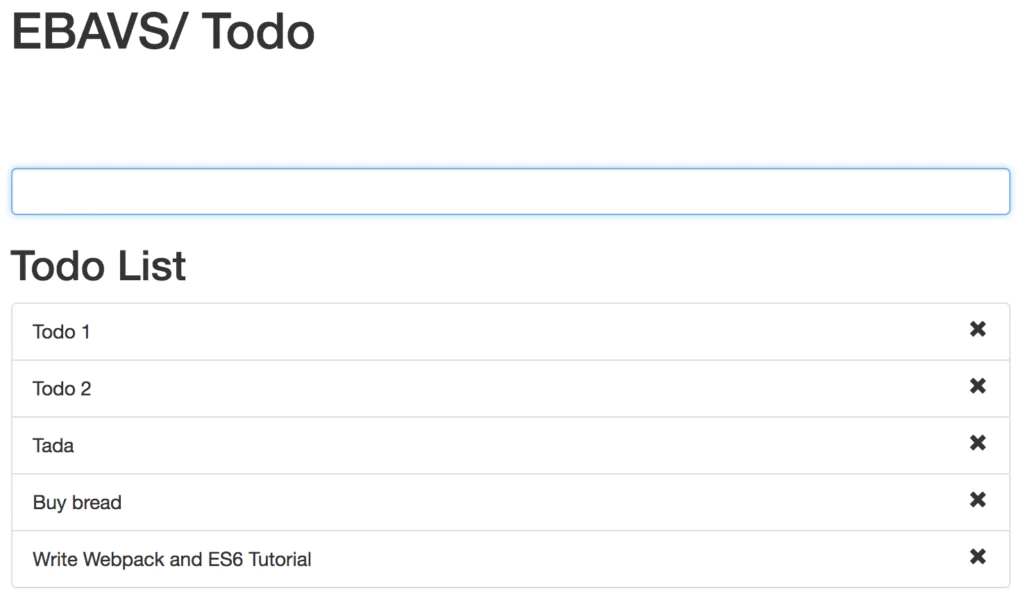
Import jQuery and bootstrap and styles and then import views and Controller and call it. Simple. If you browse now you will see the first approach to our ToDo List.
Isn’t working yet. But we will go to our final steps!
Making all working
We have the base. It’s time to finish this little project coding final events. We don’t want to extend more, don’t store todos in any place. Simply add and remove. Let’s do it!
Adding to Views
Into views, we have only brand and input text. We need to list items and to-do items. Add next lines to view.js to add new views:
|
1 2 3 4 5 6 7 8 9 10 11 12 13 14 15 16 17 |
const todoList = ` <div class="row"> <div class="col-md-8 col-md-offset-2"> <h2>Todo List</h2> <ul class="list-group item-list"> </ul> </div> </div> `; const todoItem = (item => ` <li class="list-group-item"> <span class="glyphicon glyphicon-remove pull-right remove-item" data-id="${item.id}"></span> ${item.text} </li> `); |
And now change view collection constant to add new elements:
|
1 2 3 4 5 6 |
const viewCollection = { container, todoBox, todoList, todoItem, }; |
Cool, we have now all view parts ready.
Finishing Controller
The controller has the simple binding, addItem method is empty and is static. We need to code all of this. But, first of all, we need to finish initViews because we want to inject the item list on the page:
|
1 2 3 4 5 6 7 8 9 10 |
initViews() { // add container to page const container = this.jquery(this.views.container); this.jquery('body').html(container); // insert box this.jquery(this.views.todoBox).appendTo('main'); // insert List this.jquery(this.views.todoList).appendTo('main'); } |
We have now a list rendered on the page. Time to code addItem method, but for code, we need to change the constructor to create an item list to store our todos:
|
1 2 3 4 5 |
constructor(jq, vc) { this.jquery = jq; this.views = vc; this.itemList = []; } |
And:
|
1 2 3 4 5 6 7 8 9 10 11 12 13 14 15 16 17 18 19 20 21 22 |
/** * @param {!event} e jQuery event */ addItem(e) { // only act if we press enter and input isn't empty if (e.keyCode === 13 && e.target.value) { // store this instance const me = this; // we get array lenght to use as new id const index = this.itemList.length; // creating todo const item = { id: index, text: e.target.value, }; // add todo to item list this.itemList.push(item); e.target.value = ''; // add element to dom and bind to event this.jquery('.item-list').append(this.jquery(this.views.todoItem(item)).on('click', event => (me.removeItem(event)))); } } |
Note that we are calling removeItem, create it:
|
1 2 3 4 5 6 7 8 9 10 |
removeItem(elem) { // get id from span element const id = this.jquery(elem.target).data('id'); // search for index in list const index = this.itemList.findIndex(i => parseInt(i.id, 0) === parseInt(id, 0)); // remove todo in list this.itemList.splice(index, 1); // remove element in dom this.jquery(elem.target).parent('li').remove(); } |
And bindEvents changed to; we need to change call to addItem because isn’t static;
|
1 2 3 4 5 |
bindEvents() { // we can do better but is a simple tutorial to understand webpack and es6 const me = this; this.jquery('.todo-item').on('keypress', e => (me.addItem(e))); } |
You can run the project and see that all are working as expected. If not, please, feel free to comment on any errors you have and I will help you to make this work.
Webpack config for debugging
If you browse the project and open the web inspector you will notice that is impossible to debug the project because the code is hidden inside webpack envelope. If you try to look at variable values or do some debug you will enter in a full head pain!
To avoid this situation and serve correct code to chrome we need to add an option to our webpack.config.js :
|
1 2 3 4 5 6 7 8 |
module.exports = { devtool: 'eval-cheap-module-source-map', devServer: { port: 3000 }, entry: [ conf.src + '/index.js' ], |
The devtool option allows saying webpack and webpack-dev-server that we need to use source map to our code. If you browse the project you will notice that can search files with CMD + P (Ctrl+P) and add breakpoints, etc …
Final Words
In a real-world project is probable that you don’t use jquery and bootstrap in a project. Actually are other cool tools you can use in your project like underscore, lodash or some others instead of jquery.
For me, include jquery in this project was a real pain because isn’t prepared for modern life projects. jQuery was created to make it easy life to create simple projects and projects with ES6 and Webpack are other words.
The same for bootstrap. On EBAVS/ bootstrap are changed to other CSS templates like foundation or skeleton. Bootstrap it’s a big project and sometimes we only need the grid and some helper functions to develop a single project. Bootstrap is a little monster now with a lot of components that we don’t use.
You can clone a project from GitHub: Github EBAVS/ webpack ES6 tutorial


