Mining Cryptocurrency with CPU in Production Servers

Mining cryptocurrency, actually, isn’t profitable because hardware and electricity cost is high than mining earnings. After writing my last Altcoin mining post, some sysadmin colleagues ask me if I knew how to mine in the production server. The result is this post.
Before beginning to write, I want to say that I was tested in the client beast server, underused, with client consent. The server is a basic OVH Hosting Server:
Intel Xeon D-1520 – 4c/8t – 2,4GHz
And after 2 months of mining my earns was near 0,001 Etherum.
This post talks about configuring the server, installing tools and try to mine various cryptocurrencies without hanging the server. Good luck sysadmins!
Tabla de contenidos
Mining Ethereum in Ubuntu/Debian
Actually, Ethereum needs a lot of resources to be mined. For me, the best option actually is mine Monero (next section). Anyway, mine ethereum is possible with some number of CPUs.
You need, first of all, to account in any place that allows sending your miner funds. For ethereum you could use Minergate. Here is my referrer link: Minergate
Ethminer
The next step is to install a mining tool. For our purposes, we can use Ethminer. Ethminer isn’t easy to found and install. Some searches always show cpp–ethereum project, but I don’t want to compile my tool, I want to download/install and mine.
After some research I found that I can do this:
|
1 2 3 |
$ sudo add-apt-repository ppa:ethereum/ethereum-qt $ sudo add-apt-repository ppa:ethereum/ethereum $ sudo apt-get update |
We added a new repository to our system and update the repo packages list. Then install ethminer:
|
1 |
$ sudo apt-get install ethminer |
Cool, you have installed the mining tool, and you have your minergate account, time to mine:
|
1 2 3 4 5 6 |
$ ethminer -C -F http://eth.pool.minergate.com:55751/YOUR_EMAIL --disable-submit-hashrate miner 19:51:17.163|ethminer Getting work package... miner 19:51:17.324|ethminer Grabbing DAG for #89c875b9… DAG 19:51:28.910|ethminer Generating DAG file. Progress: 0 % Creating DAG. 0% done...DAG 19:51:42.054|ethminer Generating DAG file. Progress: 1 % Creating DAG. 1% done...DAG 19:51:55.123|ethminer Generating DAG file. Progress: 2 % |
And you will see how DAG begins to generate (DAG is needed to mine ETH, it’s a big file ~3,5Gb) but if you do CTRL-Z (to put your process in the background) and write exit to leave the session, Ethminer stops working.
Using Screen
But, WTF!!! I want my miner working!! Ok, we need to make a process stay work even when we go out. Ubuntu has a solution, screen command. Some Ubuntu versions have installed and others not. You can try to install it with this command:
|
1 |
$ apt-get install screen |
The screen is an application that allows you to use multiple sessions inside the same window. If you write simply screen you will enter in a new session. You can leave with a keyboard shortcut or writing exit.
You can read a complete tutorial about screen here: Digitalocean tutorials Ubuntu Cloud Server
We only need to know some basic commands.
- screen: enters in screen mode
- exit: exits from screen
- CTRL – a ?: Screen help window
- CTRL – a d: Detach window
- screen -r: return to the last screen
And what we do?
|
1 2 |
$ screen $ ethminer -C -F http://eth.pool.minergate.com:55751/YOUR_EMAIL --disable-submit-hashrate |
Push CTRL – a d
And we can exit the shell.
But, WTF Victor!!! Ethminer is putting all my CPUs to 100%. Mmmmm … eeeeh! yeeees!

Limiting CPU Usage
I forgot to limit them! We need to limit CPU, but Ethminer hasn’t any control over CPU number or something. Then we need to install something more. Here comes cpulimit.
|
1 |
$ apt-get install cpulimit |
cpulimit allows limiting the use of one process. How it works; You need to execute the process with final &. This means that put process in the background. When you do this system says process number, for example, you can tail some log meanwhile you are continuing working:
|
1 2 |
$ tailf /var/web/ebavs.net/log/error.log & [1] 6560 |
And 6560 is the process number, we can now limit CPU use of this process:
|
1 |
$ cpulimit -p 6560 -l 500 |
-p is process number
-l is Total CPU, 500 are 50%, 1000 are 100%
Well, now we can put it all together:
|
1 2 3 4 |
$ screen $ ethminer -C -F http://eth.pool.minergate.com:55751/YOUR_EMAIL --disable-submit-hashrate & [1] 7772 $ cpulimit -l 500 -p 7772 |
Push CTRL – a d
And we can exit the shell.
Now, we have finally worked our miner on the server. We can exit all.
Return to miner screen
Our last … We exited all screens, but we want to return to control or stop our process inside a screen session, then we write:
|
1 |
$ screen -r |
And we return to our last screen.
Be careful exiting and returning, sometimes the screen creates new sessions or simply don’t want to connect to the previous screen and you will need to force entry in your miner screen.
Mining Monero
For monero XMR things change, actually, we don’t use minergate yet, we are using other pools and these pools works a little bit different. First of all, you need a Wallet.
Making our Monero Wallet
Monero Wallet is where you store your cryptocurrency. The best option is to make an account in MyMonero (my monero). When you click on Create Account MyMonero advert that is not the safest place for large amounts, but actually my riches are 0,3 XMR and I think isn’t much.
After that they show this screen with Your Private Login Key:
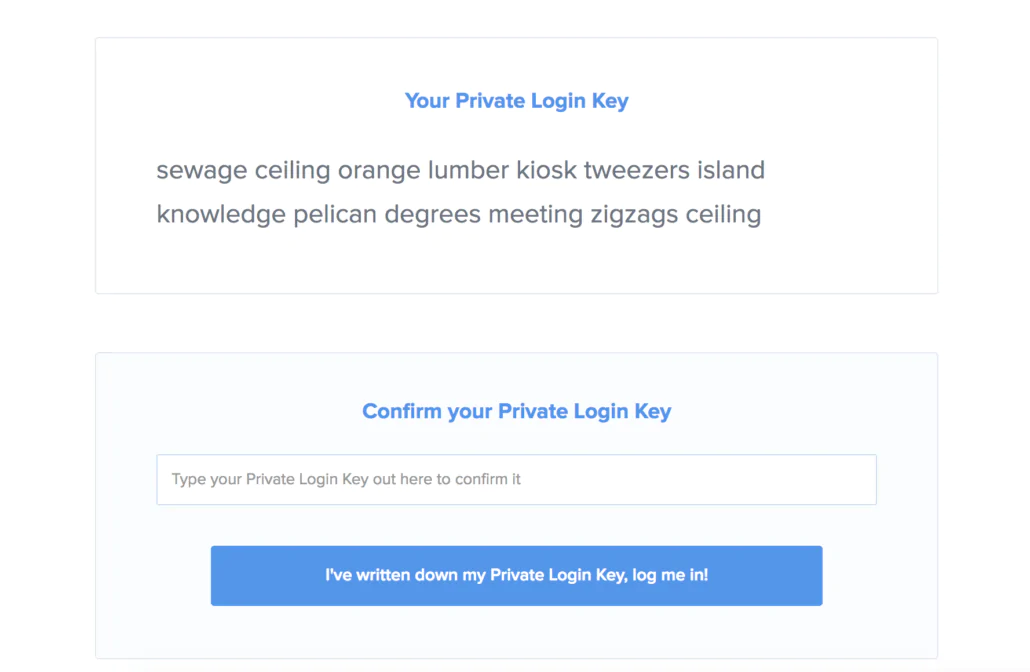
Store your private key in the safest place, if you lose this mnemonic seed, you lose your moneros. This means that you need to write on paper and put it in some safe deposit box or something. I lose, you lose XMR.
Create an account and then gets your Monero Wallet address.
You will need.
Looking For New Pool
After some research, I’ve found one service for use with these tools. Minergate isn’t an option yet because the new pools I’m using give more H/s and more rewards. Actually, I’m using supportxmr.
You don’t need to register to begin to work with their pools. Simply configure your miner’s applications with the username as your wallet address …. and done. If you want to log in simply send your email as a password in the application and you could log in in supportxmr.
XMR-Stak for Ubuntu
XMR-Stak is a project to mine Monero. Firstly, this project, was divided in three different projects; xmr-stak-cpu, xmr-stak-nvidia, xmr-stak-amd. You could choose from one of three (depending on if you want to mine with GPU or CPU). But actually, this project was joined these three applications in only one: xmr-stak.
Ok, let’s go! The process is similar to ethminer but, in this case, without cpulimit. XMR-Stak has processor selection, you can select what processor you want to mine. I will show you. Then, go to install. Project is on GitHub:
Well, login to your server and download and install:
|
1 2 3 4 5 6 7 8 |
$ mkdir xmr-stak $ cd stak $ curl -L -O https://github.com/fireice-uk/xmr-stak/releases/download/v2.0.0/xmr-stak-portbin-linux.tar.gz % Total % Received % Xferd Average Speed Time Time Time Current Dload Upload Total Spent Left Speed 100 620 0 620 0 0 1078 0 --:--:-- --:--:-- --:--:-- 1078 100 11.8M 100 11.8M 0 0 2784k 0 0:00:04 0:00:04 --:--:-- 4062k $ tar xzf xmr-stak-portbin-linux.tar.gz |
After decompress we need to create configuration files, but xmr-stak can do it by himself, simply execute:
|
1 2 3 4 5 6 7 8 9 10 11 12 13 14 15 16 17 18 19 20 21 22 23 24 25 26 27 28 29 30 31 32 33 34 35 36 37 38 39 40 41 42 43 44 45 46 |
$ ./xmr-stak.sh ./xmr-stak.sh Please enter: - Currency: 'monero' or 'aeon' monero - Pool address: e.g. pool.usxmrpool.com:3333 37.59.52.83:3333 - Username (wallet address or pool login): 46qwxYavWAhTGvXodNoiSZNuXDr4rNx4FiMh6NdXnP2tFFBFiQggZT6C2qRT1i2B2iduunbhoUpwrKznWNX44eTXm3Y - Password (mostly empty or x): teststak - Does this pool port support TLS/SSL? Use no if unknown. (y/N) n - Do you want to use nicehash on this pool? (y/n) n - Do you want to use multiple pools? (y/n) n Configuration stored in file 'config.txt' [2017-11-23 16:41:58] : MEMORY ALLOC FAILED: mmap failed [2017-11-23 16:41:58] : MEMORY ALLOC FAILED: mmap failed ------------------------------------------------------------------- xmr-stak 2.0.0 0005e4a Brought to you by fireice_uk and psychocrypt under GPLv3. Based on CPU mining code by wolf9466 (heavily optimized by fireice_uk). Based on NVIDIA mining code by KlausT and psychocrypt. Based on OpenCL mining code by wolf9466. Configurable dev donation level is set to 2.0% You can use following keys to display reports: 'h' - hashrate 'r' - results 'c' - connection ------------------------------------------------------------------- [2017-11-23 16:41:58] : Start mining: MONERO WARNING: NVIDIA Insufficient driver! [2017-11-23 16:41:58] : WARNING: backend NVIDIA disabled. [2017-11-23 16:41:58] : WARNING: UNKNOWN_ERROR when calling clGetPlatformIDs for number of platforms. [2017-11-23 16:41:58] : WARNING: No OpenCL platform found. [2017-11-23 16:41:58] : WARNING: No AMD OpenCL platform found. Possible driver issues or wrong vendor driver. [2017-11-23 16:41:58] : WARNING: backend AMD disabled. [2017-11-23 16:41:58] : CPU configuration stored in file 'cpu.txt' [2017-11-23 16:41:58] : Starting single thread, affinity: 0. |
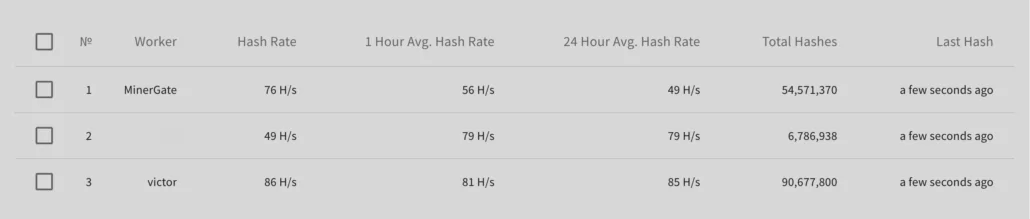
When you execute, xmr-stak, looks for config.txt and cpu.txt. If these files aren’t there program ask you some questions. Currency to mine, URL for pool and some more, I recommend that answer like me, excepting Username that is your monero wallet address and password, that you can write wherever you want. Is important that the password be unique because identify your instance in the pool. I have 3 machines working and the password looks like Workers t in the machine list:
Then, Here are three important lines to look for:
- Configuration stored in file ‘config.txt’
- CPU configuration stored in file ‘cpu.txt’
- MEMORY ALLOC FAILED: mmap failed
The two first lines say that config files are saved. Let’s see.
XMR-stak cpu.txt
In cpu.txt is where xmr-stak saves CPU configuration after system testing. Look file:
|
1 2 3 4 5 6 7 |
"cpu_threads_conf" : [ { "low_power_mode" : false, "no_prefetch" : true, "affine_to_cpu" : 0 }, { "low_power_mode" : false, "no_prefetch" : true, "affine_to_cpu" : 1 }, { "low_power_mode" : false, "no_prefetch" : true, "affine_to_cpu" : 2 }, ], |
For a four (4) CPU system, xmr-stak, generates three lines, Total CPU – 1. If you read my other post you know that is important to leave 1 CPU free when mining. For this particular case, I will put only 1 CPU. Because this machine sometimes has tasks to do.
XMR-stak config.txt
this file has some other configs, for me, the important is:
|
1 2 3 4 5 6 |
"pool_list" : [ {"pool_address" : "37.59.52.83:3333", "wallet_address" : "46qwxYavWAhTGvXodNoiSZNuXDr4rNx4FiMh6NdXnP2tFFBFiQggZT6C2qRT1i2B2iduunbhoUpwrKznWNX44eTXm3Y$ ], "currency" : "monero", |
You can configure to some important things like run in daemon, or activate HTTP for show reports via the web. This could be important if you are running the process on a server but is out of the scope of this post.
MEMORY ALLOC FAILED: mmap failed
This is normal, XMR-Stak needs some memory to mine and systems to have limits for only one process.
To solve this problem; open /etc/sysctl.conf and add at the end:
|
1 |
vm.nr_hugepages=128 |
Then open /etc/security/limits.conf and add at the end:
|
1 2 |
* soft memlock 262144 * hard memlock 262144 |
You only need to leave the session and enter again and this value applies, don’t need to reboot. If you have more errors or problems you can go to:
Put XMR-stak to work
Ok, easy, no?
|
1 2 |
$ screen $ ./xmr-stak.sh |
CTRL+a d
And go to work!
XMR-Stak for Windows
When you work with Windows all is different. Simply download from here:
Download Zip Github Xmr-Stak releases
Decompress wherever you want, in some folder and just execute it, xmr-stak ask same questions the ubuntu version:
|
1 2 3 4 5 6 7 8 9 10 11 12 13 14 15 |
xmr-stak.exe - Currency: 'monero' or 'aeon' monero - Pool address: e.g. pool.usxmrpool.com:3333 37.59.52.83:3333 - Username (wallet address or pool login): 46qwxYavWAhTGvXodNoiSZNuXDr4rNx4FiMh6NdXnP2tFFBFiQggZT6C2qRT1i2B2iduunbhoUpwrKznWNX44eTXm3Y - Password (mostly empty or x): teststak - Does this pool port support TLS/SSL? Use no if unknown. (y/N) n - Do you want to use nicehash on this pool? (y/n) n - Do you want to use multiple pools? (y/n) n |
And begin to mine automatically.
Nothing more, you can disconnect from your Remote Desktop and server continue mining for you.
Don’t forget to adjust CPU number in config.txt to avoid using all CPUs in your server.
Claymore’s CryptoNote Windows CPU Miner v3.5
One of my favourites, and was the first I’ve found to mine with CPU is Claymore’s CryptoNote Windows CPU version. You can download it from here:
github nanopool Claymore-XMR-CPU-Miner releases
Decompress it and you can run with a command like that:
|
1 |
NsCpuCNMiner64.exe -o stratum+tcp://pool.supportxmr.com:5555 -u YOUR_WALLET_ADDRESS -p x -t 4 |
My command is:
|
1 |
NsCpuCNMiner64.exe -o stratum+tcp://fr01.supportxmr.com:5555 -u 46qwxYavWAhTGvXodNoiSZNuXDr4rNx4FiMh6NdXnP2tFFBFiQggZT6C2qRT1i2B2iduunbhoUpwrKznWNX44eTXm3Y -p new_worker -t 4 |
But Claymore has an extra cool option. You can specify -low CPU option that increases hash rate if you have a CPU with AES-NI capability.
Final Words
Is easy to mine in any system, if you have patience and don’t need a lot of rewards you can easily use not used CPU. There are some more options like ccminer or CPUMiner-multi. You have also Minergate but actually, I don’t recommend that due to their low hash rate and high fee.


Hi, thanks for making such informative article!
I started to mine monero by xmr-stak on vps (Ubuntu 14.04 /1 core) for fun recently. I found out that CPU usage reached to 100% easily but I’d like to limit it to 90% to avoid the ban.Could you advise know what command to run? I’m a very beginner in tech honestly and would like to get your advice hopefully.
Below is a part of the cpu.txt
“cpu_threads_conf” :
[
{ “low_power_mode” : true, “no_prefetch” : true, “affine_to_cpu” : 0 },
]
Hi jms,
as explained in article you need to use cpulimit application.
You can found under Limiting CPU Usage section.
Regards,